
Design can be a tricky subject for any marketer, especially when it comes to creating promotional material. You basically have two options: outsource the task or put on your design hat.
If you decide to give the latter a-go, this article will help you create a clean and effective design for your next promotional postcard. It will also walk you through step-by-step where to find appropriate material as well as tools you can use to create your final product.
Step 1
First you’ll want to think of a photo or image that fits your promotion. That’s the easy part (auto loan = car, mortgage loan = house, etc.). Finding a copyright free image that matches what you’re looking for is another story. However, if your company already has an archive of photos or pays for stock photos this part might not apply. But for those of you who don’t have these stock photo resources available, here are a couple sites where you can start your search for free goods:
If none of those resources have an image you like, you can always continue the search on other sites. Just make sure the photo license is copyright free or under the Creative Commons license CC0. Otherwise you’ll need to pay to use the image.
To walk you through the process, I’m going to be making an auto loan postcard to send out to a targeted group of account holders. Here’s the free image I chose from gratisography.com:

Step 2
Next you’ll want to come up with the copy. Keep in mind this text will have to go on top of the image you decided on, so keep it short and simple. Let that awesome image you worked so hard to find do most of the talking for you. You should try and get your main idea across in two lines or less. It’s important to remember what we’re selling here. With a postcard, we want to drive foot traffic in our branches, traffic on our websites or inbound phone calls. It’s a good idea to keep that in mind while coming up with the copy.
I would suggest coming up with a catchy one-liner that applies to the promotion and then a short section including the actual deal for the back of the postcard. Coming up with one-liners is no easy task, but there are steps you can take to work through your writer’s block.
Try writing down 25 different options/versions of what you want to say. I know, that sounds like a lot, but don’t let yourself get caught up in making them all perfect or even good. This exercise is to help you brainstorm. You might come up with one you love or find out what you definitely don’t like. Either way you’re getting the creative juices flowing.
You can also use the image you chose for inspiration, or look into old sayings that you can put a twist on. The possibilities are endless, but don’t let that sidetrack you from connecting the copy to the promotional message.
Here’s what I came up with:
One liner: “Life can take you to some amazing places, we can help you get there.”
Deal: “Auto loan rates starting as low as #.##%”
Note: steps 1 and 2 are interchangeable. It really depends on how you want your process to work!
Step 3
Now that you have your image and copy ready to go, it’s time to unleash your creativity. If you’re worried you don’t have the artistic skills of Michelangelo stashed in your back pocket, don’t worry. There are a few easy tricks and tools you can utilize to create your masterpiece with little creative energy required.
First you’ll need to open a program that allows you to edit your photo and apply copy. The most obvious resource for this Adobe Photoshop. Since Photoshop requires a paid license for use and at least some knowledge of the program, you might need a different option. That being said, for the sake of this article I’m going to use Photoshop to create my final product. If you don’t have access, there are other online programs you can utilize to create similar results.
Using Photoshop, here are the steps I took to edit my image:
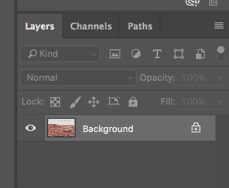
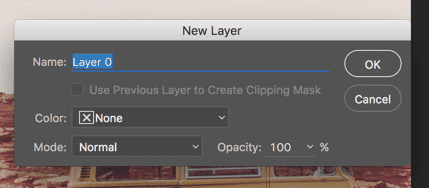
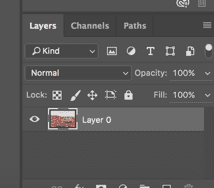
A. Once you open Photoshop, go to File –> Open and find your image. The image will import as a Background Layer initially, double click on that and it will change it from a locked background to Layer 0 (which is what you want). The Layers panel should be located at the bottom right hand of your screen.
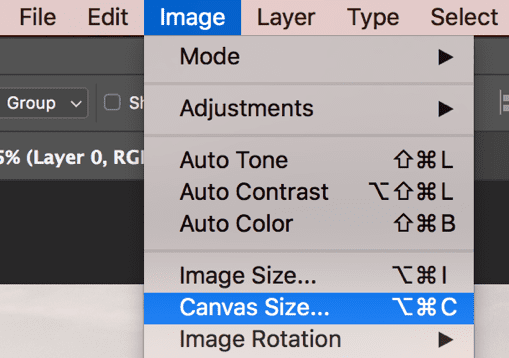
B. Now that you have your image, you’ll need to resize the canvas to the correct postcard dimensions. You can do this by going to Image –> Canvas Size and change the width and height. Then we just need to resize the image so it fits inside our corrected canvas size.
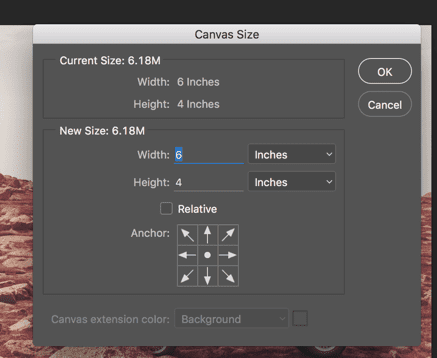
Short Cut: clicking Command + T (or Control + T if you’re using a Windows computer) will allow you to resize the image and if you hold the Shift key as you change the size, the image will keep its original dimensions and not distort.
C. Now it’s time to add your copy. Using the Type tool, located in the left hand toolbar, you can click anywhere on the photo and just start typing. You also have the ability to change the font, color, size, and spacing of your copy to fit whatever you think looks best. For this postcard I used the font Roboto for the main type (which can be downloaded for free from Google Fonts), and SignPainter HouseScript (which comes with Photoshop) for “get” to add some style. I chose to make it green as well because it fits with my company’s branding.

Since the initial one liner fills up all the available blank space on the image, we can either get a little creative to add the deal information to the front of the postcard, or put that information on the back of the postcard. If you want to go with the first option, adding a solid color box can be a quick solution to this problem. I made my box using the same green color again and added the text in white on top to make it more pleasing to read. I also left room on the far right side for a logo.

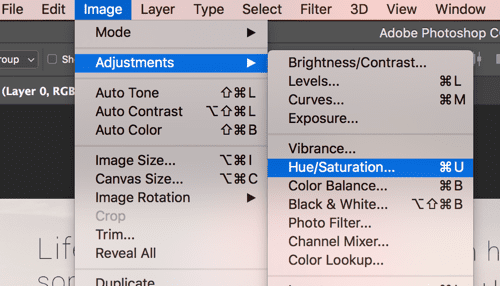
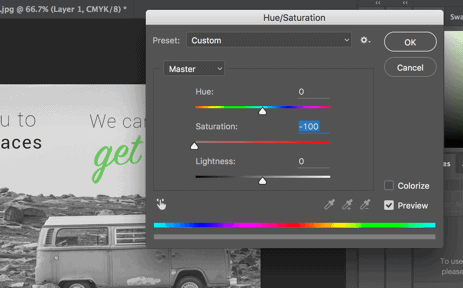
D.The postcard looks pretty good as is, but since we’re already in Photoshop there are other things we can do to make it even cleaner. I personally like the look of Black & White images. If you do as well they’re pretty simple to create. Just make sure you have your Layer 0 selected and go to Images –> Adjustments –> Hue/Saturation and bring the Saturation all the way down to -100.
In the same Adjustments tab there are other techniques you can play with to enhance the image further. I always like to use the Brightness/Contrast option to help make the image a little less flat. Here is the result:

I did some additional stylized editing, that I won’t go into here, but there are plenty of free online tutorials for Photoshop if creating this postcard has sparked you interest. Here is my final version, which you can download for free from Onovative’s Template Library:

Some Final Thoughts:
- Make sure you size your postcard accurately and use the correct margins for your company’s print provider. You don’t want to accidentally send out a couple hundred communications that have had some of the copy cut off in the printing process.
- Follow any branding guides your company might have. Use company colors and logos to give the postcard a professional look.
- Take some time to think about the copy on the back of the postcard as well. Spending time to add a little flare to the backside of your postcards will get people excited about your offers.
- Have fun with it! Even if you don’t normally design your own collateral, it can be rewarding to test your abilities and have a hand in the creative process.
- When in doubt, reference simple but key design principles like alignment, contrast, and balance.
- If you REALLY don’t like the idea of designing your own postcard, or just simply don’t have the time (I know you probably have a million other things on your plate). You’re free to use any of Onovative’s premade postcard templates in our template library.

